
For Less headaches Later, Start With a Clear Overall Concept
This is Part 2 of this series, Part 1 starts here
The Molding Details
Once the basic wants and needs have been thoroughly discussed, it’s time to dive into the overall cabinet and joinery details. There are many factors to weigh and balance in these decisions. Some are as follow.
I like to, if possible, keep the dimensions of components within standard lumber thicknesses. This saves material and time, both add up quickly. Standard rough lumber comes in 4/4 ( 4 quarter) which is about 1″ and mills out to 3/4″ to 7/8″ and 8/4, about 2″ which mills out to 1 3/4″ to 1 7/8″. Depending on species and supplier you can sometimes also get 5/4 (1 1/4″), 6/4 (1 1/2″) and 12/4 (3″) This gives us a few constraints to work from.
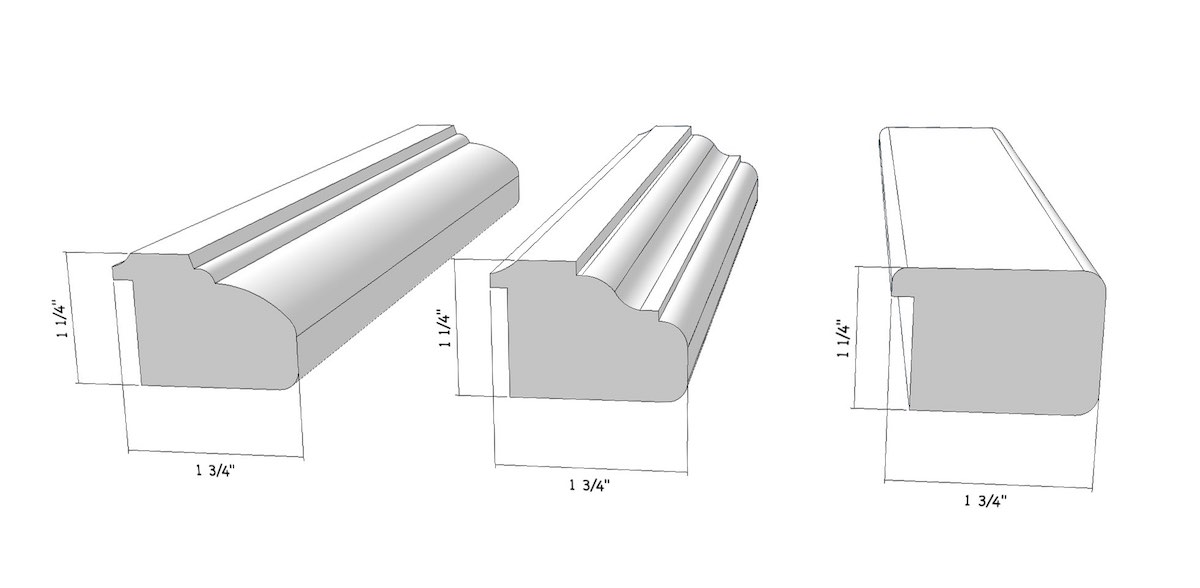
An end view of three “typical” sea-rails
The sea-rail can be designed with nearly infinite variations, but most of the time with fall within a fairly “normal” range. An owner may want them to be flush with the cabinet top or more likely a little bit above the top. The latter choice will probably “age” better, ( more on Aging Gracefully ) be less of a problem to assemble and will act as a stop for anything trying to slide off. Sometimes an owner will want to incorporate a hand grab into the sea-rail, maybe just in key locations and sometimes pretty much anywhere that makes sense. This adds a bit of a challenge and potentially, a very functional and attractive benefit.
Read More4 Preliminary Steps When Starting a Yacht Interior Design
I firmly believe that interior design on a new yacht should start no later than when the hull is started. The following steps should be considered preliminary and set the look and feel of the interior, so it would be better to start them earlier, maybe as overall discussions about the project start.
Please keep in mind that the following are a very much simplified overview of this process. Each one of these steps has many, many sub-steps, but it is a good starting point for a project.
When starting a design for an interior for a yacht , I usually start with the styling for a sea rail detail This is a prominent design element, it interacts with many other elements and helps set the overall look and feel of the cabinetry. Then I would start to design cabinet details around the sea rail. As I start I would generally consider the following as I start to work out a concept: 1) what look would suit the customer? 2) what look would suit the overall boat styling, 3)what are the budget concerns or constraints, 4) what are the capabilities of the shop that will build and install the interior. Lets look at these steps in more detail.
1) Suit the Customer
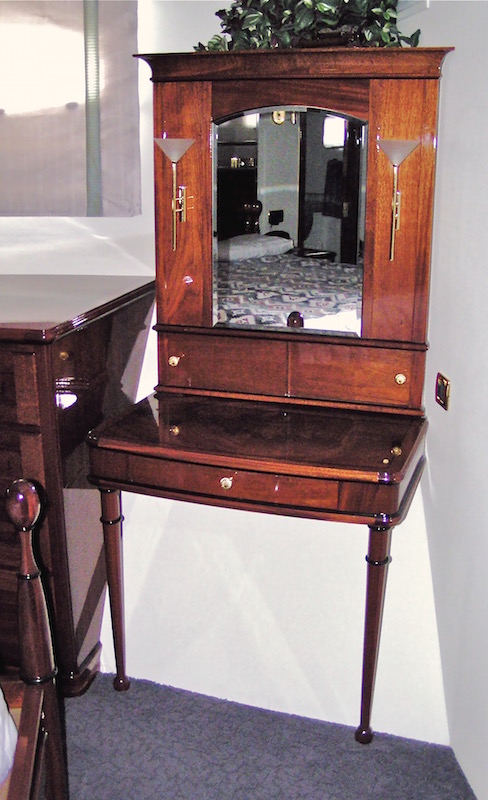
A custom table meeting a very specific request from a customer.
I like to sit down with the customer and discuss their likes, dislikes and personal preferences. Hopefully they have brought some pictures of styles that they like. Maybe they even mention a particular style such as; Arts & Crafts, Shaker, Traditional look with flutes, Mid Century Modern, etc all of this helps. Do they prefer more soft goods, (fabric and wallpaper) or more architectural elements (wood work) to set the tone? Will the boat be used as more of a second home and be lived on for weeks or months at a time or more to entertain friends and business associates ? All of this is important and helps set the tone.
2) Compliment the Vessel
Now that I have an idea what the customer likes, which to me is most important, I would look at the boat. What is the general style? Maine lobster boat, North sea trawler, 1980’s tri-cabin, rakish express cruiser, these would all influence the styling. The Lobster boat and the Trawler may both be “calling out” for a more traditional look but I would tend to us smaller more refined details on the former and likely somewhat heavier more robust details on the latter. You really have to look at each boat and just get a feel for what would be appropriate,and this is not one particular look but a loose range.
3) What is the Budget
Is this a new custom one off, a customization of a new semi production boat or maybe a refit of an older vessel? What is the customers budget? What is the value of the boat? How will the boat really be used? What makes sense for this particular project? The type of wood, specific hardware, style, design and difficulty of construction can make a huge difference, so these need to be looked at carefully in regard to the overall goals.
4) The Builder
Before finalizing the construction details I would want to talk to the people that are responsible for building and installing the interior. What is the skill level of their crew. Do they have specific techniques that they are set up to do efficiently? Do they have special equipment, such as a CNC router, that make some difficult tasks much easier? If so do they have a competent operator and programer on staff? Not considering these factors can lead to frustration and headaches for everybody. Designing details that are above their capability will likely end up with a result that costs too much and might not achieve the intended result. On the other hand not taking advantage of their skill set and work flow might have the same basic result, but only because they have been constrained. You wouldn’t know what they are truly capable of without some in depth discussions with them.
Putting it All Together
After getting through the above I will put together a “look and feel” proposal that has recommendations for wood(s), style, some hardware and fixtures. Chances are this will go through quite a few changes …… but you have to start somewhere. This can be a lot of work, but, if you skip the above steps you will have a hard time getting a coherent, functional, well planned interior that meets your needs and wants.

Initial concept board
Next Steps
General concept details
3d models
A sample cabinet
Approved details
Wood selections link to it’s just wood
Interior mock-ups link to cardboard and sticks
Start clear concise drawings link to clear drawings
Dan

Pacific Yew Inlay on Douglas Fir
Read More
Shipwright Style Quick and Easy Bevel Board
A Quick and Easy Bevel Board
I
t seems that quite a few of the readers here are “hands on” boat owners and like to do as much of their own work as is reasonable. I think that is great and would encourage people to do so if they have the time and are willing to develop the skills. Yes, much of the carpentry on a boat is considered “tricky” but if you are prepared to plan out the steps carefully and have the patience to take the time that is needed, you will probably do just fine.
Where am I going with this? Well, I thought that I would write a few posts that are aimed at people that would like to tackle more of their own carpentry projects. This will include some drawings for some basic shop fixtures, design details and some resources to help you get your boating projects done.

Shipwright Style Quick and Easy Bevel Board
Here is the first one: a Quick and Easy Bevel Board. I’ve made nice plexiglass ones, and lost them. I’ve used protractors and though they got the job done, I thought that they were awkward at best. If my bevel board was in my tool box on a boat and I was back in the shop, well I didn’t have it where I needed it. Not wanting to handcraft several of these or buy two or three at $20 apiece I started looking at alternatives. One afternoon I was at my computer drawing some cabinet details and a simple solution popped into my head, I could just draw one in SketchUp and print them out as needed. It took about ten minutes to draw. I have some 8.5×11, full sheet label paper, so I set up a pdf page with three bevel boards on it and printed it out. I cut them out on a paper cutter, though a sharp knife and a straight edge wold work just fine, peeled the backing off and stuck it to a a piece of 6mm Aquatek plywood. It worked great and is very accurate . I did cover the paper face with a layer of clear packing tape to protect it. You can download the pdf file here
Read MoreCardboard and Sticks, Why an Interior Mockup is a Good Idea
What is a mockup? Generally it is a quickly built prototype.
• a mockup gives a good feel for the real space
• a mockup helps focus on usability and function rather than materials and small details
• a mockup allows you to interactively problem solve
• encourages experimenting, the materials are easy to work with and inexpensive
Mockups are commonly used by designers and builders to get real world feedback on a design or space. Yes there are drawings, but those don’t give the full-scale walk through the space experience. And in reality most people can’t visualize from a 1/2 inch to the foot scale drawing. In a yacht interior, often we are balancing taking an inch here and giving an inch there just to make everything work. Sometimes this is due to a constraint such as, the size of an appliance or equipment access and sometimes it is more related to what works for the specific customer. Is there room to walk through reasonably? Does that cabinet block my view? Will I hit my head going down the stairs? It really is much better to discover any problems before the actual building begins. Generally they are not that hard to fix, in fact you can work them out in the mockup quickly, then make sure that the changes are documented. This information does need to be incorporated into the build drawings and notes or it will do no good. This pdf, Mock-up notes , is from the documentation of a Northwest Trawlers 50.
Read MoreMaple with a Few Variations
I thought that it might be interesting to look at a very common north American wood, Maple. Now there are actually quite a few different species that grow in North America but for most purposes they are broken down to Hard Maple and Soft Maple
Hard Maple, includes sugar maple and black maple. It is a hard,dense, tough wood. The weight ranges from 40 to 45 pounds per cubic foot. The working properties are generally good. Being denser it tends to hold up to high wear areas better, you can damage it but not that easily. It is generally considered a very good cabinet wood. This wood tends to lean towards the lighter tones to almost white.
Read MoreIt’s Just Wood, How Many Decisions Can There Be?
Actually this may seem simple at first, but it is commonly a challenge to come up with the final choices. There are many factors to consider. Availability, color tones, grain patterns, density and workability are some of the decisions. Once you have picked the general species, you still have to determine the actual look, within reason, that you would like. Some of this will be solid lumber and much will be veneer. These do not have to be the same wood, often I like to use something simple for the background (cabin sides and bulkheads) and something a bit more interesting for the cabinets and door panels. This becomes more important when the majority of the interior is wood, less so when there is some fabric or wallpaper to break it up.
Read More