I‘d like to go a little deeper into drawings and documentation in this post. What we will look at, is part of the drawing package for a door jamb and casings on a yacht. The total drawing package is not the minimum to get a the parts made, instead, it is what is needed so that everybody involved will have a clear understanding of the process. We want to insure our outcome of getting consistent, built as intended parts in the end. So what factors do we have to consider when designing this set of drawings?
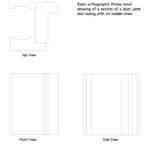
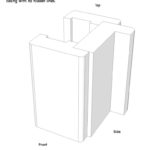
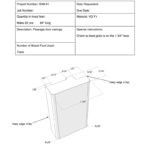
Well, first most people are not very good at visualizing an object from looking at standard orthographic drawings.These are the flat, no perspective, front , top and side view drawings that are typical. See the drawing to the left. The drawing is, for most, is hard to grasp, and this is a simple piece! The next drawing, a perspective view, is much easier for most people to understand. I guess thats because the piece shown, looks like a sample of the actual part. That is easier to understand than mentally trying to assemble multiple abstract views together into a clear picture.
You might be thinking that this could be true for most people, but the crew actually building the pieces must be skilled at reading and understanding construction drawings. I wish this was true, but many of the skilled joiners I have worked with have done a great job of honing their woodworking skills, but often not their visualization or drafting. Many of the people that have graduated in the last ten or fifteen years have never even taken a drafting or blueprint reading class, let alone several years of them. The more motivated, that would be the ones have a career not a job, are likely to have learned how on there own, but thats not the norm. The more complicated the part or assembly of parts becomes, the harder this gets.
So what do we do to work around this problem?
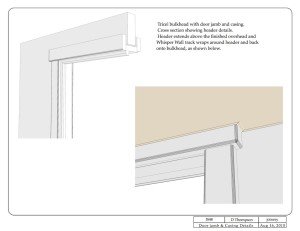
I have been building yachts and yacht interiors for over twenty five years and over that time I have learned a lot about communicating ideas and concepts. With customers, I really want them to know what to expect and clear easy to understand drawings are key to this. I don’t want a customer to walk into a stateroom on a project, blank look on their face and say ” uh– this isn’t what I thought it would look like” , unless it was suppose to be a surprise. Accurate easy to understand drawings are critical in this, along with good verbal skills.( In other posts I will discuss sample cabinets and full mockups, which are next steps in this process.) See the Header and Overhead Details drawing. This shows clearly how the jamb,casing and header come together and how the header engages the overhead fabric. In this case it is fabric in WhisperWalls track with a bead around the perimeter.
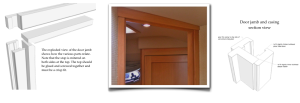
Just as important is the how the info is presented to the builders. It won’t do any good to have customers that have a clear, vision if that vision is not properly carried out. The information that was shown to the customers needs to be turned into working drawings and broken down into manageable steps and processes. The Millwork Work Order to the right is a good example of one step. This has all of the information that a reasonably skilled joiner needs to go forward and efficiently build these parts. This is all of these parts needed for this project, we only want to set up and do these once. There would be a similar drawing for each part for the door jamb package. The drawing at the top of this page shows view of the assembly “exploded” indicating how the piece goes together. There would also be a drawing and table giving dimensions of each of the door jambs. Once all of the parts are milled these would be assembled on a workbench, then installed.
So are all those drawings necessary? Couldn’t somebody knock out a “napkin sketch” and build them without all of the fuss. Sure, it’s done all together to often. Unfortunately consistency and efficiency tend to suffer. Coming up with details like this you have many factors to consider such as, bulkhead thickness , surface treatments on the bulkheads, door thickness, door hardware and how they will be installed.
I hope this helps. In another post I will go over a cabinet and show how a package is developed along with the related information and drawings.
Dan
